The Complete Guide to JK2/JK3 Character Compiling
Psyk0
It's been a while since Jk2 came out and people are still making mods and custom characters/models for this great game. New people are joining the Lucas Forum asking for help on various subjects, since i've done characters i thought i'd share what i have learned from other developers on character setup. Tim "Spacemonkey" Appleby is the one who started it all for me (and a few others i'm sure)...at first i looked at the game engine and thought, if this is like Quake 3 it'll be a piece of cake to create new player models. I soon realized the process was a bit different, since i made a few attempts at making Quake 3 player models, i had a pretty good idea of how things would be put together. I got the missing information i needed from Tim's tutorial about the hierarchy, model segmentation and caps. So thank you Tim!
Welcome to the world of JK2/JK3 character development...i hope this document will be as complete and helpful as possible. The process itself is not too hard if you have done some work with 3D Studio Max or modelling software before, but it takes a lot of patience!. Note: I'm not going to tell you how to create a 3D character, i'm gonna tell you what i have done to compile my own characters. If you need tutorials for character modeling, check out pimm's character modeling tutorials.
The right tools for the job
1.3D Studio Max 4 up to version 8+ works, UPDATED PLUGINS available for recent max version HERE
2.Softimage XSI 3 (or a version that can export a compatible XSI 3.0 file). No other packages will work for player models so dont waste your time.
Everything you need for compiling can be found in Raven's >SDK Tool Kit V1.0<
Alternate Link for SDK
-The .XSI plugin (only useful on older max versions)-Carcass.exe
-Assimilate.exe
-Modview.exe
-Kyle's skeleton
_humanoid.gla
-Winzip
-Window's Notepad
-Jedi Knight II/III CD (duh)
-Windows regional settings / keyboard set to U.S. (i'm not kidding!)
Description of the tools
The .Xsi plugin
-This will be useful to import Kyle's skeleton and tags so you can start building and weight your mesh around it.
-It's also used to export your completed model to .XSI (the only file format readable by carcass)Carcass
-This is a DOS command line executable file that does the conversion of your .XSI (softimage) model file to .glm (Ghoul format) used by JK2/JK3 for player models.
-This program is never actually used by us, it's used by assimilate, unless you like typing stuff in DOS.
(This program is a real pain in the ass when you dont follow the rules...so be careful)model.car
-A .car file is a file that contains command line parameters to compile a character via carcass.exe in DOS mode.Assimilate
-This is the user friendly interface for carcass, instead of using command line parameters, you let assimilate do the work by simply clicking a few boxes.Modview
-I use it to check the newly exported model for faults, so i dont have to load JK2 everytime i need to see how the mesh deforms.Kyle's skeleton and tags
-Make sure you build or fit your mesh around this skeleton or you will have animation problems._humanoid.gla
-This file is has keyframe data that all the player characters use for single player and multi player.Winzip
-Used to pack your character's dir tree so it can be "found" by the game.Notepad
-This will help you create or edit a .skin file. A skin file is used to assign textures to various parts of the model. You can also edit .surf files, surf files are used to add or remove some mesh objects to add variation to the character.Windows regional settings set to U.S.
-What does that have to do with JK2/JK3 you ask? well seems like carcass compiler doesnt like the metric system, if you dont change your settings, carcass will report this error message: "error, file contains cubic scale keys" and wont do squat with your file!. You also need to have your keyboard set to U.S. and remember to reboot when you change your settings.
Setting up the work path
Since Jk2 is based on the Quake 3 engine, we need to create a base folder to hold the player model.-So go ahead and create this directory structure:"c:\base\models\players\"your player model"-the next step is to add the animation file to:"c:\base\models\players\_humanoid"-Where is the _humanoid.gla file you ask? in the assets0.pk3 file in your gamedata\base folder of JK2, a .pk3 file is a zip file that's been renamed. All you need to is do open it with winzip, find the file _humanoid.gla...just sort the files by type and look for gla you can also extract the .cfg file (animation sequence file). Make sure it's in "base\player\_humanoid".-I installed the Raven tool kit in c:\base which should give you c:\base\toolsOnce installed look for the following files: carcass.exe and assimilate.exe, copy these files to base\models\_humanoid. Take the XSIImporter.dli plugin and place it in your 3D Studio Max plugin dir.Open up assimilate.exe, go to properties and change the compiler line to this: c:/base/models/players/_humanoid/carcass.exe
Remove everything for the "Quake 3 dir" path.You should now be ready to start your project.The process behind JA's player models
If you are new to game modding or this engine, you should know a few things about the animation system before you get started. Jedi Academy (and Outcast) are based on the Quake 3 engine, using the Ghoul 2 animation system by Raven software (also used on double helix).
If you are a total noob when it comes to JA character modeling, you should know that every single player model needs to be fitted around the skeleton, segmented into limbs, weighted (you "attach" the mesh to the skeleton so it can deform properly) hierarchy linked, capped and finally exported to .XSI format so it can be compiled with carcass.exe into a valid .GLM. Lost yet?
The GHOUL 2 tag system allows the possibility to "bolt-on" objects quite easily. Since JA's main weapon is a lightsaber, it's only natural to have flying limbs all over the place! This is where bolts/tags come into play.
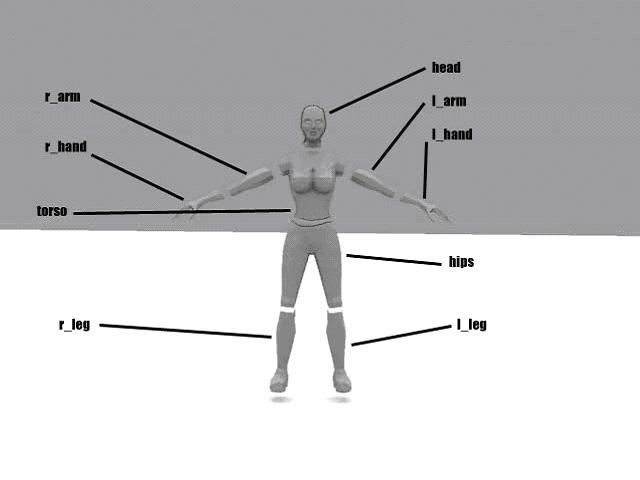
Think of your character model as a bunch of tubes, the tubes represent the limbs, for the saber dismemberment, we have to divide the one-piece character into 9 basic limbs, we have: head, left arm, right arm, hands, torso, hips, lower legs etc. . Of course once you divide the limbs they will be hollow at the open extremities and you can see inside the "tube", that's not good!...to fix this "problem" the openings are capped.
Since the caps are bolt-on objects too, they also have tags. A tag is a triangle mesh telling the game engine which position/orientation the bolted object should have. Each limb and cap have their own pre-assigned (and named accordingly) tags.
NEVER rotate tags out of their initial alignment, do not assign textures to tags, do not attach tags to other objects, all of the above will make them useless.
Once the limbs have been detached, you can start the rig process, later you create the caps, move the tags in their proper position (i said move, not rotate!) and link all this crap together. If you are lucky, you'll get a nice player model once you compile the .XSI file.
Character building basics (workflow)
This is pretty much the same thing Spacemonkey discussed in his tutorial, with some comments/tips from myself.
Steps i did for my models (yes you should follow in that order):
(If you are using the JK3 skeleton, steps 1 & 2 are already done!)
*1.Import Kyle's Skeleton from .Xsi (Or load this MAX FILE)*2.Weight the tags to the skeleton
3.Modeling (build your model around the skeleton with previously weighted tags)
4.UVW Mapping
5.Segment your model
6.Cap the segments (can be done after the hierarchy)
7.Weight the mesh to bones
8.Link the hierarchy
9.LODs (they are not mandatory)
10.Export to .XSI / Compile thru assimilate
NOTE: When importing Kyle's .XSI file, his legs shouldn't be sticking in front of him...if they are, un-check the "animation" box in the XSI import menu. You could also download Kyle's skeleton and weighted tags in the tutorials section of this website.
Do not move any bones out of place when working with the skeleton, remember to always hit ctrl-z when checking mesh deformations!. If you move bones out of original position, you will see weird mesh tearing or other errors.
The tags
I weighted every single tag to the nearest bone, NOT all the tags to only one bone. So now i dont have to worry if tags are weighted or not, i know they are and it's less of a mess. I can hide them and concentrate on the model itself.
Do not rotate any tags. Tags are not flat on the caps, they should be aligned to the center of the cap, pointing towards the body part it is linked to (again take a look at kyle's mesh, you'll see what i mean).
There's a really useful tool that will help you place the cap tags correctly. It's called the align tool, (check your top menu bar in max, you should find it easily.) Now what you want to do, is to select the tag related to your cap, click on the align tool and select it's parent cap, once that's done, you'll see a grey box appear.
You need to select what you want to align...on the left side, select pivot point and on the right side select . Left side being the cap's element you want to align and right side being the target object you want to align your tag to, in this case we want center of the object. Next check the XYZ "match axis" option box, or something similar. If youve done it correctly, you should see your tag right in the center of the cap (if not, try selecting other alignment options.)
The reset Xform syndrome
Ok so you have completed your mesh, you think you are ready to go? well maybe not, there are two things that most people overlook when rigging their model in 3D Max. The first one involves the reset xform modifier. Let me remind you that it is best that your character is made of a single mesh, that way you will have less chance of having reset xform issues.
What the hell is a reset xform modifier? simple, when you move, scale or modifiy the object or its pivot point, its properties appear to have changed (like when you scale, the object is scaled down and appears fine). When in reality, max keeps track of the last state the object was in...well most of the time.
To verify this, create a simple cylinder and use the mirror tool to make a copy...with the new mesh selected, go to the utilities tab and hit the reset xform modifier button...what just happened? you should see the normals (faces if you prefer) being flipped. Go to the modifier stack and collapse it, next in polygon or element level select all the faces and flip them back, voila, you just fixed an object with the reset xform modifier. Imagine that your character has been rigged and its ready to be exported, but you forgot to use the xform modifier...not a pretty sight!
If your model has been rigged already (skin is applied, hierarchy has been linked) you can still try to fix things up:
First save your scene under a different file, transformed objects can behave strangely and screw up the model seriously. Use the reset xform modifier on your meshes...add it to every meshes (not the tags or skeleton!) and move it down under the skin modifier.
Once it has been moved down, right click on the modifier and hit "collapse to" NOT collapse all or you will lose your weight setup.
After doing this, a number of meshes (most likely the ones that have been mirrored) will have their faces flipped...go in polygon mode (or element) and select all the faces and flip them back so they are facing the right way (aka flip the normals). You might have to unlink the hierarchy for less screwed up results.
The correct alignment
The other very important step that should not be overlooked is the correct alignment through the "stupidtriangle_off" tag. I dont have Kyle's Xsi in front of me but i believe thats what raven did...and i like to follow the rules, cuz sometimes it can come back and bite you in the ass. Ok so you have built you character around the raven skeleton, everything is UVW mapped (or not, apparently some people prefer to wait 'till the end for uvw maps...dunno why.)
Again, it is strongly recommended to build your mesh as a single piece or the least possible, the body parts will be detached later. Once the mesh is done, uvw mapping can begin. (for the beginners, UVW mapping is unwrapping a 3D object's surface to a 2D bitmap so it can be painted on.)
I wont go into the details of UVW mapping, hopefully i will have a tutorial online later to help. I consider UVW and skinning (process of attaching the mesh to the skeleton) the most time consuming part of the job. Make sure you UVW map BEFORE you start weighting.
Caps should not be done at this point...this should be done when uvw mapping and when everything is ready to be mirrored (cuz at some point you want to mirror your uvw maps to get the maximum space...right???).
Why align every mesh?, i have no official explanation why this should be done, however, i suspect the stupid triangle is a major element of the character (cuz you link the hips to that and the tag itself gets linked to the other root objects) hierarchy wise...
Keep the "stupidtriangle_off" and your character's mesh visible in the viewport. What you need to do is "slice" your character in half (vertically from the crotch to the neck/head...) at this stage i always apply a reset xform modifier to every mesh (dont forget to collapse the stack)...once thats done, select your sliced head mesh and go to the "align tool" in the top toolbar with the mesh still selected, press "H" on your keyboard and you should see the selection window pop-up, select the "stupidtriangle_off" tag, the align tool box will appear.
Select "pivot point" for both objects, check "match orientation XYZ", the pivot point of your object will share the same one as the "stupidtriangle_off" this will give a pretty good location for your other half when mirrored. Repeat this step for every mesh of your character (the head and boots probably have been modeled separately, so you must align them the same way).
Once it's done you are ready to mirror your half to the other side...when everything has been mirrored, you of course need to attach everything back together at the midle (use the non-uniform scale tool along the X axis to regroup the verts together and hit "weld" @ 0.1 in the verts rollout. Dont forget to add a xform modifier to make sure normals are facing the right way.
When comes the time to detach the body parts, they will keep their pivot point aligned to the "stupidtriangle_off" if you move something out of place you will need to re-align it to the "stupid_triangle" and yes apply another reset xform modifier every time you move/scale something!..
A word about texture maps:
Every texture needs to be placed in your "\base\models\players\"your player model" directory, some people recommend using .TGA files when exporting...(havent experienced any problems with jpegs so far). In 3D max's material editor, assign each texture map from that dir to your model, the reason you have to do this is to make sure the files are correctly assigned from the start.
Once you are happy with the model and texture layout, you can begin the segmentation of the model, JK2 has a strict model construction guide that you need to follow.
Here's a quote from Tim on the subject:
"Firstly, your model needs to be segmented into nine basic parts. These 'basic' parts all need to be labeled correctly as in the diagram below.
Well maybe I should explain why you need to do this. If you remember from playing the game your able to sever other characters limbs using the lightsaber. All the segments shown in the picture put together make up your whole model. Its easy to segment your model, simply go to edit mesh - sub object mode - polygons - and then select the area’s of the model and 'detach' labeling correctly."
Here's what he means by detaching/renaming correctly:
The model is segmented in 9 basic body parts, what you need to do is detach the polygons to form one of those parts.
Take the hips for example, in sub-object mode, select the polygons roughly above the knees, next use the "detach" function and when prompted for a name, you call it "hips", do not use any capital letters when naming basic body parts or anything else for that matter.
You have to do this for each part that will be cut off by the saber in-game. You can check Kyle's xsi to see how the parts were segmented..shouldnt be too hard to figure out.
When naming extra body parts, the extra part will always contain the name of it's parent mesh. For example, if i've made a pair of sunglasses, it will inherit the parent's name like this: head_sunglasses. This naming convention cannot be changed.
Caps
They can be done before or after the weighting.
Tips on Creating caps:
Here's how i create caps...In sub-object mode/edges, i select the open edges, obviously, then hold shift + the uniform scale tool, your edges wil extrude inwards, once extruded a few % i just select collapse.
Once that's done, i select the faces that make the caps and hit detach and rename the cap, the resulting surface is a perfect average of all the edges it was created from and lines up perfectly with its parent mesh. Dont forget to uvw map and assign your cap texure or texture file from the stormtrooper.
"Weighting" or skinning is the next process (when i say weighting, it means: telling a vertex how much influence it will receive from the bone it's weighted to). 3D Studio Max uses the "Skin modifier" (what a coincidence!) to attach the vertices to bones, it shouldnt be too hard to find, just check the modifiers list. You can check out my skin modifier tutorial here.
Linking the hierarchy
One of the final steps...i do this after the weighting is done. Very easy to do...the tool is called "select and link"...3rd icon on the main toolbar (right under tools, two boxes with a red chain in-between)
First you select the body parts that will be linked, let's take the left leg for example:
Select all of the related tags/meshes, in this case:
bolt_l_leg_calf
bolt_l_leg_cap_hips
bolt_l_leg_foot
l_leg_cap_hips_offonce they are selected, hit the "select and link tool" next press H, from the list select it's parent mesh...that would be hips and that's it.
That's the method i recommend, linking straight in the viewport can cause problems sometimes, like linking to the wrong body part.
Check Tim's tutorial for a detailed list of the linked objects.
UPDATE: Now there's an easy way to link the hierachy, using the JK2 autolinker script available right here, thanx to BoBo Fett for this wonderful tool!, remember that this will only link standard meshes, if you create extra objects (like head_sunglasses) you will need to link them to their respective parent mesh (in this case the "head" mesh).
Specific weighting
The bones/tags that control the saber movement and force powers need to be correctly weighted or the special moves (back stab, saber spin) will be crooked, the blade will not rotate correctly and it will look like crap. Force powers may not appear from the hand, which could look awkward, small details often make the difference.
How to correctly weight the saber/force powers' bones and tags
This is by no means the official method, but i never had any problems with force powers or saber movement. That's my method, feel free to experiment.
1.For the left hand: the "lhand_tag" bone is not deforming any vertices, but it is still added to the bones list, remove any verts that are influenced by it. I usually weight the "bolt_l_hand" tag to the mc5 bone.
2.For the right hand: the "bolt_r_hand" is weighted only to the "rhang_tag_bone" the "rhang_tag_bone" is NOT part of any bone hierarchy (means its not added to the right hand's bone list)
Facial animations
This is not required, mainly used in SP of course...if you want to use your player in SP, it looks better. You have to detach a "face" from your "head" mesh in order for this to work, you also have to create a mouth and some teeth. Take a look at kyle's mesh to see how its put together.
Back to the weighting, only 9 bones need to be weighted. Add and weight the following to the "head_face" mesh: "cranium" "ltlip2", "lblip2", "leye", "reye", "rtlip2", "rblip2", "ceyebrow" and "jaw". That's it.
LODs
They are not necessary, but would make a lot of people happy...i havent done any yet, but i know how, what are you saying? im lazy? k you're right.
You can reduce the polys to your liking but, the whole point of doing this is to take the load off the cpu/video card. Check out Edward Perretti's tutorial for LODs knowledge.Exporting to .XSI / Assimilate
(See "setting up the workpath" at the top of this page, if you dont follow my rules, then i cannot guarantee it will work, cuz that's what works for me.)
Exporting from 3D max to .XSI: go to File, then export, select XSI from the drop down list. The default options you need are already checked (make sure to uncheck "animations", unless you wanna try to make your own .GLA).
Save in your "\base\models\players\_humanoid" folder, you can call it whatever you want, but since i follow the JK2 guidelines, i always name it "ROOT.xsi".
Open up assimilate:
Go to preferences, the quake dir should be blank and the compiler line should be:
c:/base/models/players/_humanoid/carcass.exe
if you did set it up like i said...
Leave enum file as is.
close the preferences box.
Next, make sure nothing is loaded (click new, or the blank page to the left)
If you want assimilate to create a .skin file using your texture path, click the" _humanoid folder" and select "Make-EF1 type .skin file"
next, go to >File then >Add files, select the
_humanoid.gla from the base\models\players\_humanoid. Next click B, a DOS window should appear and display a succesful conversion message or a dreaded error message.Creating custom GLA file (animations)
If you want to create your own animations (if you are crazy enough to create 17,000-27,000 frames ;)) there are a few things you need to do...first when exporting your character, select the "mesh_root" object from your scene and delete it. Launch assimilate, BUT add your ROOT.xsi model and double click on it (where it says single-player mode)...check "Keep motion bone" and "make it's own skeleton" change the path to "models/players/_humanoid/"the name of your new animation" dont name it _humanoid.gla!!!! you can also change the path so it points to your character dir (just make sure you remove c:) Next go to the "frames target" option (press + on the folder...) hit clear where it says ROOT do not change anything else (for now...maybe experiment later). If that worked you should see your new animations in modview.
Possible error messages from carcass
(see carcass error guide in tutorials section)"Error, file contains cubic scale keys"
If you see this error message, you NEED to change your keyboard/regional settings to U.S. standard. Why? because if you dont live in the U.S., most likely your windows settings are preventing carcass from doing it's job. I believe it is because of the metric system. Carcass needs to work with inches and commas. Fine, dont change it, dont blame me if it doesnt work!"Code 12"
You either have a "ghost" object in the scene or a mesh without bones / weights assigned to it. This could happen (ghost object) when you segment your model and detach the last mesh (you are left with an object that has no polygons but max still treats it as a mesh).What you need to do is click H, and you should see and empty space (at the top?) in the selection box, select the "blank" object and delete it.
Other error codes are mostly hierarchy related, carcass will display a message saying some surfaces cannot be reached. Go back and check your hierarchy, a simple way to see which parts are not linked: select the "Parent" objects like the torso mesh, the arms should follow. If you select the hips, everything will move with it. You can also select the mesh root/model root helpers and move them around. Just remember to hit ctrl-z to put everything back in it's place!.
If you get an error message saying some "bone" cannot be found, it means that bone shouldnt have any weights assigned to it, BUT it is still included in the bones list, carcass will not find bones if they are not added in the bones list but there are some exception, see "specific weighting".
Skin files and flipped faces
Load up your .glm model in >modview
you have successfully exported your character, but some body parts look weird or dont have any skins?
If it looks like your textures are inverted, it is probably due to mirrored objects in 3D studio max. When mirroring, scaling or moving objects some mesh properties are changed without you even noticing. When you mirror/move/scale or rotate a body part, ALWAYS apply a "reset X form" modifier (before weighting if possible)...after you add it to your mesh you will see your normals being flipped...i have no idea why this happens. Collapse the stack, select the faces and hit "flip" so they face the right way.
The modifier can also be added to your model even if it's been weighted, but you need to move it UNDER the skin modifier. Flip the faces back and select collapse to instead of collapse all.
Another possible error could be a wrong path in the .skin file, a .skin file is a simple text file that can be edited with windows notepad, make sure all paths/texture names are correct.
Making a .PK3
Very simple, create a directory on a root drive (meaning a new folder not a sub-folder) install winzip if not already installed...lets call it "packaging" create a sub-folder models/players/"the name of your player model" spaces are not allowed use _ underscore instead. Put your .glm, texture and skin files in there...next right click the "models" sub-dir and select add to zip file, that should create a zip file called models.zip, rename to "yourplayername.pk3" and thats it.
Adding custom sounds and Bots
Sounds: let's use the "packaging" dir again, create a sound directory in there (packaging/sound) add these sub-folders /chars/your_player_name/misc, in other words the full path is: packaging/sound/chars/your_player_name/misc. put the sound in the misc directory, they should be sampled at 44khz if they are in .mp3 bitrate can be anything. To add this dir to your zip file, simply re-pack your models dir to model.zip next right click the sound dir and right click once again, but this time click add to recently used zip file and of course select models.zip.
Botfiles are pretty easy, create a "botfiles" folder (packaging/botfiles) and put your botfile in there...just use an existing botfile and modify to your needs.
This tutorial contains the knowledge i acquired from Tim Appleby's tutorial, my own errors/ experimentations & from the Lucas Forum modding community.
If you think something is missing, send an e-mail.