Guide to getting a model in to JediKnight 2
by Tim 'spacemonkey' Appleby
Intro
*Order of things
Capping the
*
The Tags
Lods (levels of detail)
The Hierarchy
Bones and Weighting
*
UVW Mapping
Assimilate
*Getting a skin on your model
*Getting it in game
Intro
Fun, say goodbye to your girlfriend/wife/partner because your about to be a busy little bee. It’s not an easy process to get a model setup and working for jedi knight two, but the rewarding satisfaction and excitement you achieve by doing so more than compensates for it. Personally I liked the fact that I didn’t have to do any animations (although I could have done with the practice) it just mean that writing this tutorial was a whole lot easier and quicker than it would have been otherwise.
In practice, the principals of putting a model into Jedi knight 2 are quite simple. I have only been using Max for just over a year and I was able to do this without the need for a tutorial, so with my advice on these different sections most max users should be able to ace this. However, I'm sure as time progresses; holes will appear in this tutorial as I'm bound to have missed some details out. Well here's what I learnt so sit back relax and don’t be afraid to draw reference and write your own tutorials on getting a working model in JK2.
Order of things
I recommend;
Modeling - you actually build your custom model (build your model around the skeleton from the root.xsi (I wish I had))
UVW Map your model
Fit your model around the root.xsi skeleton if you didn’t follow my advice and actually build your model round it.
Cap the segments.
Add the tags.
Weight the mesh and tags to bones.
Create the hierarchy.
Export away.
*I didn’t follow this sequence yet I was only learning how to do this on my own so I had to make a few mistakes, don’t make the same ones as I did.
Tutorial
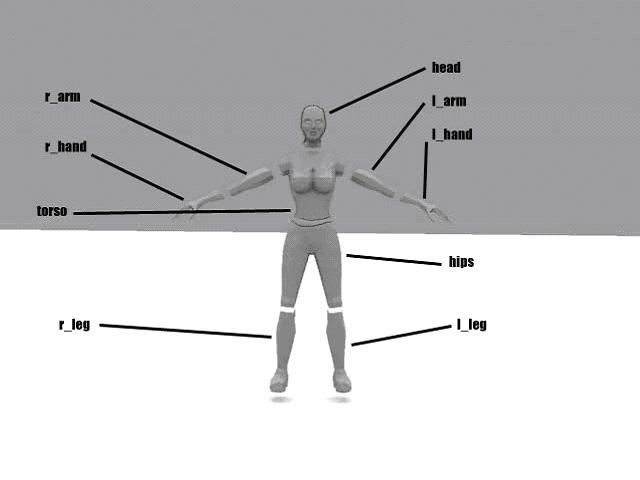
Firstly, your model needs to be segmented into nine basic parts. These 'basic' parts all need to be labeled correctly as in the diagram below.
:c3po: We're Doomed! I'm never going to get a model in to Jedi knight 2.
Well maybe I should explain why you need to do this. If you remember from playing the game your able to sever other characters limbs using the lightsaber. All the segments shown in the picture put together make up your whole model. Its easy to segment your model, simply go to edit mesh - sub object mode - polygons - and then select the area’s of the model and 'detach' labeling correctly.
:c3po: But what if I have a part that is not included on your picture? Are they the only parts I'm allowed to have or can I have more?
No, they are the 'basic' parts as I stated before. For someone new to modeling/Max then it would be best for them to keep to the basics but for people who are more proficient you can segment your model into further parts - as necessary by naming them as an extension of the nearest basic segment. For example, you have a model with a helmet, but you do not want it to be part of the head. After detaching the helmet, you name it head_helmet . There are several reasons why a person might do this; a good example is the Kyle character in JK2. He has a shoulder pad but on one of the skins, it does not appear. His shoulder pad was alpha’s out (made transparent) to add more variety to the model. The shoulder pad would have been called r_arm_shpad, once again using the basic segment name.
*Note that all the Labels are in lowercase, this is because Raven have used all lowercase, probably to avoid any confusion as using upper case and lower case could get messy.
Each LOD - level of detail that you create for you model also require being segmented except you ad _1 to the end for the 1st LOD and so on. I will explain about that in more detail soon.
------------------------------
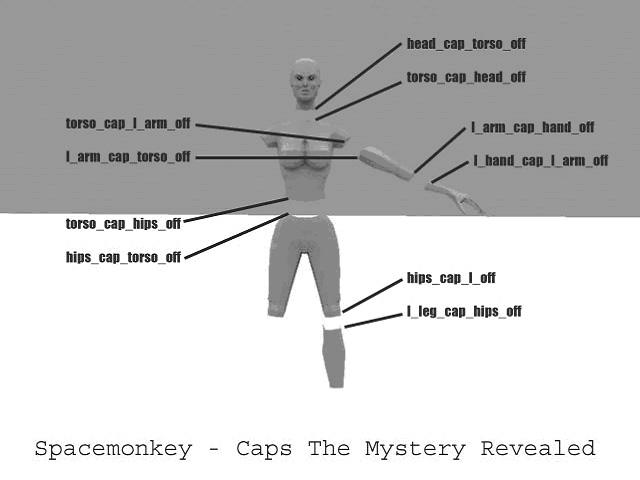
Ok the caps! Important as we know already so here is a little diagram to help explain them.
There are five groups of caps. Five because there are five area's which we are able to slice people into.
These groups are:
Head- to torso
torso_shoulder to arm
arm to wrist
torso to hips
hips to legs
:c3po: but shouldn’t a model have two legs and two arms? I can only see the labels for the caps on the left arm and left leg!
Ok I have only shown the labels for
one arm and one leg in the tutorial it just happens to be the left. (YE
:c3po:
Well I use 3dsmax. What I recommend is that you select the edges of the part you need to create a cap for. i.e. the wrist. You've selected the outer edges and now you choose extrude (from your edit mesh options) you pull it out and then use the uniform scale tool to drag together those edges. (You could use the bevel tool to achieve the same affect obviously or even extrude the edges, then use the collapse option.) Then you need to go into vertex mode (sub mode of edit mesh), you select the newly created vertices that you pulled together and you weld them all. Then you make sure you have them selected and you click detach. Rename them with the appropriate name and hey presto your first cap.
:c3po: Alright I've capped my wrist but I noticed when I was playing with it that its visible from one side but not the other.. Is this going to be a problem?
No this is just what you want. Having polys on both sides would be a waste, as you would never get to see half of them. However, since we selected the edges and extruded and out we have the polys that need to be visible on the right side. When you chop off the wrist, you need to have the l_hand_cap_l_arm_off cap visible. Make sure you have labeled each one correctly and not got any mixed up. Check my picture for reference and pay attention to the fact that I have specifically marked which edges the labels should be applied to.
HoPe this Helps :D
---------------------------
Level of Detail
Ok Lods,
For now however a quick description of LOD's and why they are used.
Well most JK2 models have 4 LOD
:c3po: Hey wait - I thought you said there was four lods?
There are four LOD
:c3po: ok so how many polys should the second LOD be? ( LOD_1)
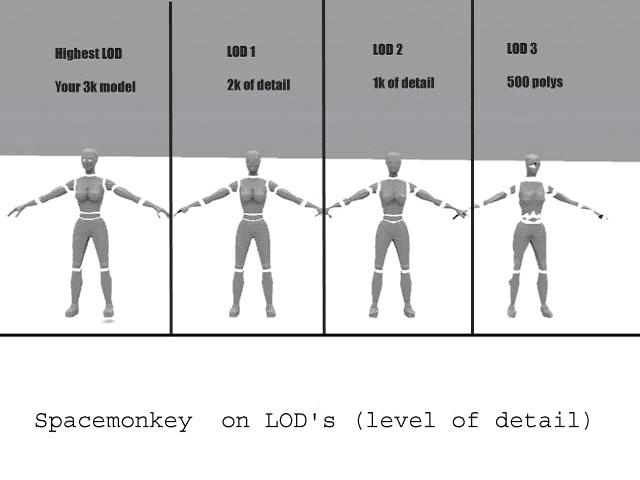
Well I'll list what all the LOD
Primary LOD: 3k
LOD _1 : 2k
LOD _2 : 1k
LOD _3 : 500 polys.
:c3po: yes I'm still confused.
LODs are required because they help to make the game perform better. Any model worth making is worth doing well. I'm not going to explain things deeply but Lods reduce some of the strain off peoples 3d cards - why? because they allow the game engine to use a lower poly version of your model when the model isn’t seen up close. This means your 3d card doesn’t scream at you and refuse to play. Although the original models all have 4 lods included - the official line from the guys at Raven its that you only really need to create 2, that is two extra Lods. (RAVEN: The point here is to get your poly count down. If you start out at only 1K polys, then you really only need one more LOD to get down to 500. The more you make the better the model will perform at a distance.)
:c3po: couldn’t I just copy my model 3 times and use them as my LOD's?
yes you could but that would be missing the point completely. Its possible to get a model into game without the Lods - but they are crucial for running these high end games because they do lighten the load on our graphics cards. If you are going to include lods at all the it’s best to do it properly, there’s really no point in copying you model 3 times because you can get your model in game with just the single lod (the highest level of detail).
Check out my image above. It shows 4 versions of the same model. It shows from the highest detail version down to the lowest detail version.
They are all copies from the original model but modified - having various degrees of reduction in polycount.
For the moment you don’t have to worry about LODs! There are TAGs and BONEs to come yet before you even have to think about doing the lods for your model.
Brian
*If you have LODs then you must make sure that the each mesh in the highest LOD is
represented somehow in the lower LODs with the same name only with a "_*" suffix
where * is the number of the LOD or number of iteration.
-----------------------------------------------------
Once your model is segmented and
capped it should look like this. (see above)
so some of your are wondering how can you segment your model and still have it look as if
its solid? Well that’s because you don’t move it when your working with it.
For example, it’s easy to segment your model, select the faces and detach them. Now
you've got your model segmented and you need to cap it right?
Once you've collapsed the edges select the newly created faces and detach! Rename
them to the appropriate label and right click again. Unhide all! Voila - your model is all
back and you've made a cap without moving anything. Isn’t this fun? :)
--------------------------
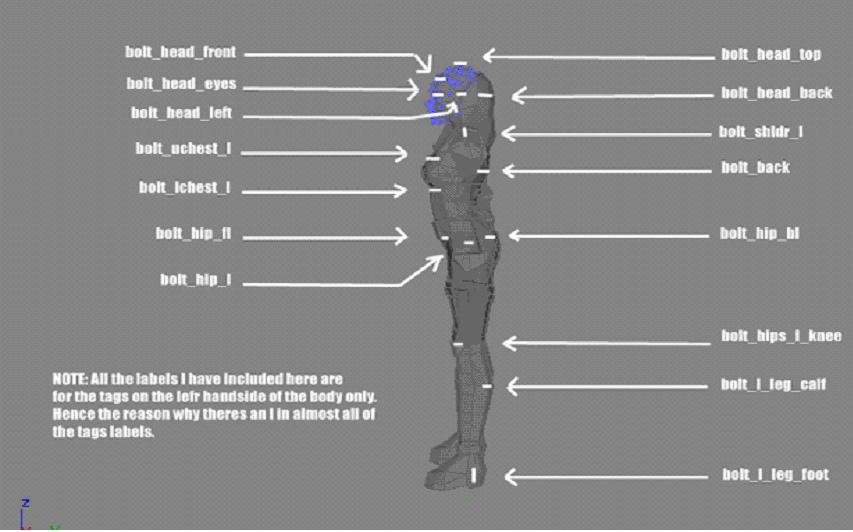
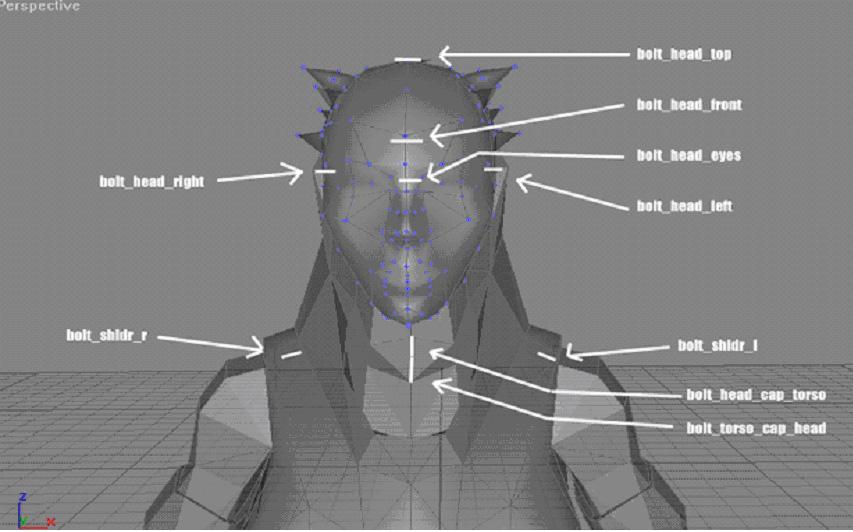
The Tags
Here we go. Assuming you have imported a root.xsi model and stolen all the tags from it for your own model they should roughly be in place. Once my model was in postion - adjusted to fit the skeleton then most of the tags will fall roughly into place. You'll have to adjust them to make sure the ones that mark your caps are moved so that they are touching your caps.
-------------------------
The Hierarchy
'The general process of creating
links is to build the hierarchy from child to parent. You click
Once objects are linked, any transformations applied to the parent are also applied to its children. For example, if you scale the parent to 150%, the size of its children and the distance between the children and the parent are also scaled by 150%. '
-quote from max.
Ok so we know how to link stuff right?
:c3po: well actually I've had problems, call me stupid but when I select the objects to link the link icon appears but then when I click on the thing to link to it simply selects the object I wanted to link too :(
Ok what you’re doing wrong is that you need to hold the mouse button down after you've selected the objects and when the link icon appears. Then you drag it to the object you want to link to and a little trail of walking ants appears, release and hey presto your first link. Remember you select the 'child/children' and then link to the parent!!!
:c3po: thanks, but why exactly do we have to link things together?
Well you know when you cut a players
arm off in game? The program needs to be able to establish quickly which parts of the body
are attached to each other. This works like so- if you cut a players torso off then it
needs to know that the arms are attached to the body, and that they are its 'children'.
On to the crap you need to link together.
This list is in the
bolt_l_leg_calf
bolt_l_leg_cap_hips
bolt_l_leg_foot
l_leg_cap_hips_off
-select them and link to l_leg
-----------
bolt_r_leg_calf
bolt_r_leg_cap_hips
bolt_r_leg_foot
r_leg_cap_hips_off
-select them and link to r_leg
------------
bolt_head_back
bolt_head_cap_torso
bolt_head_eyes
bolt_head_front
bolt_head_left
bolt_head_right
bolt_head_top
head_cap_torso_off
*face + eyes also need linking if you've included them.
-select them and link to head
--------------
bolt_l_hand
bolt_l_hand_cap_l_arm
l_hand_cap_learn_off
-select them and link to l_hand
---------------
bolt_r_hand
bolt_r_hand_cap_r_arm
r_hand_cap_r_arm_off
-select them and link to r_hand
----------------
bolt_r_arm_cap_r_hand
bolt_r_arm_cap_torso
bolt_r_arm_elbow
r_arm_cap_r_hand_off
r_arm_cap_torso_off
r_hand
-select them and link to r_arm
-----------------
bolt_l_arm_cap_hand
bolt_l_arm_cap_torso
bolt_l_arm_elbow
l_arm_cap_l_hand_off
l_arm_cap_torso_off
l_hand
-select them and link to l_arm
-----------------
bolt_back
bolt_chestg
bolt_hip_bl
bolt_hip_br
bolt_hip_fl
bolt_hip_fr
bolt_hip_l
bolt_hip_r
bolt_lchest_l
bolt_lchest_r
bolt_shldr_l
bolt_shldr_r
bolt_torso_cap_head
bolt_torso_cap_hips
bolt_torso_cap_l_arm
bolt_torso_cap_r_arm
bolt_uchest_l
bolt_uchest_r
torso_cap_head_off
torso_cap_hips_off
torso_cap_l_arm_off
torso_cap_r_arm_off
head
l_arm
r_arm
-select them and then link them to torso
------------------
bolt_hips_cap_l_leg
bolt_hips_cap_r_leg
bolt_hips_cap_torso
bolt_hips_l_knee
bolt_hips_r_knee
hips_cap_l_leg_off
hips_cap_r_leg_off
hips_cap_torso_off
torso
l_leg
r_leg
-select them and then link them to hips
--------------------
hips
-select and link it to stupidtriangle_off
--------------------
stupidtriangle_off
-select and link it to mesh_root
--------------------
mesh_root
-slect and link it to model_root
--------------------
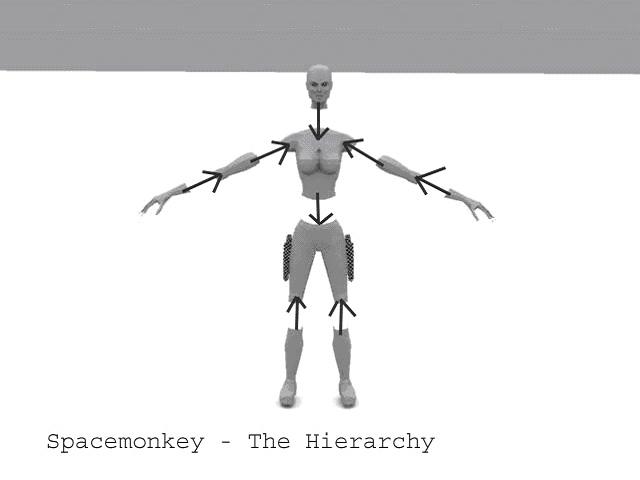
This pic
demonstrates in the simplest form the flow of the hierarchy, if you link everything I told
you to in the
------------------------------
Bones and Weighting
Getting the mesh positioned around the skeleton is very important. I don’t recommend modifying the skeleton’s size at all but what I did (that worked well) is to position my model around the skeleton. Its possible to select say the legs and hips, apply an edit mesh that will affect all of them and then manually move the legs so that they are nicely placed with the bones in the center of the mesh. Then when you deselect you model is still segmented - but when you select the individual segments you will see an extra edit mesh modifier on top. Because you applied the edit mesh to several objects this can cause problems later, so select the top most edit mesh in the stack and right click and select collapse to. Collapsing the stack will fix any problems that the 'rogue' modifier might cause your mesh in the future.
:c3po: ok I think I move my model into position around the skeleton, what’s the next step?
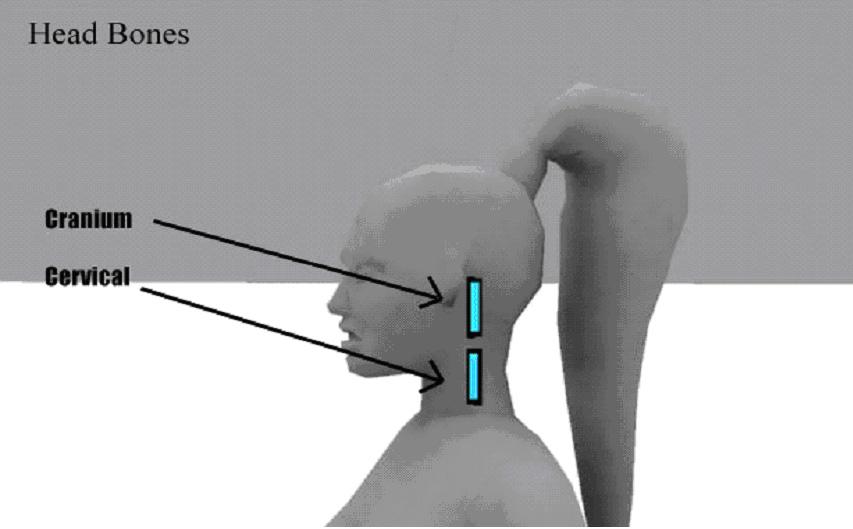
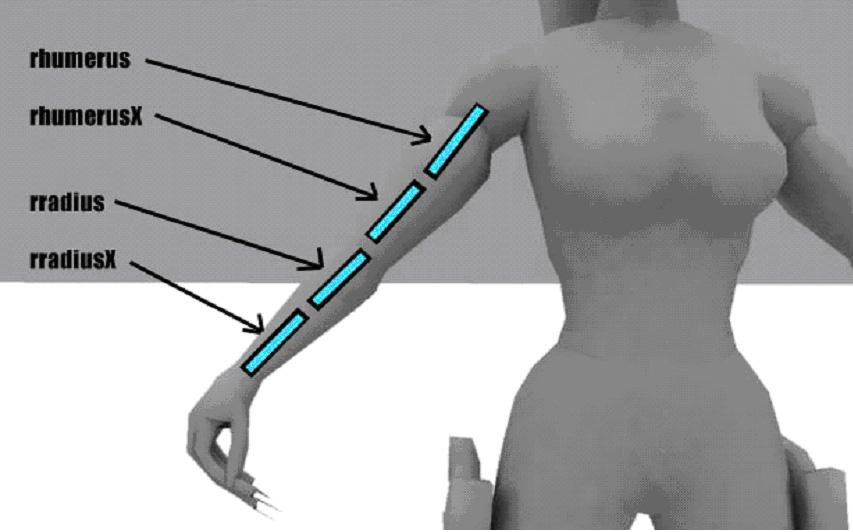
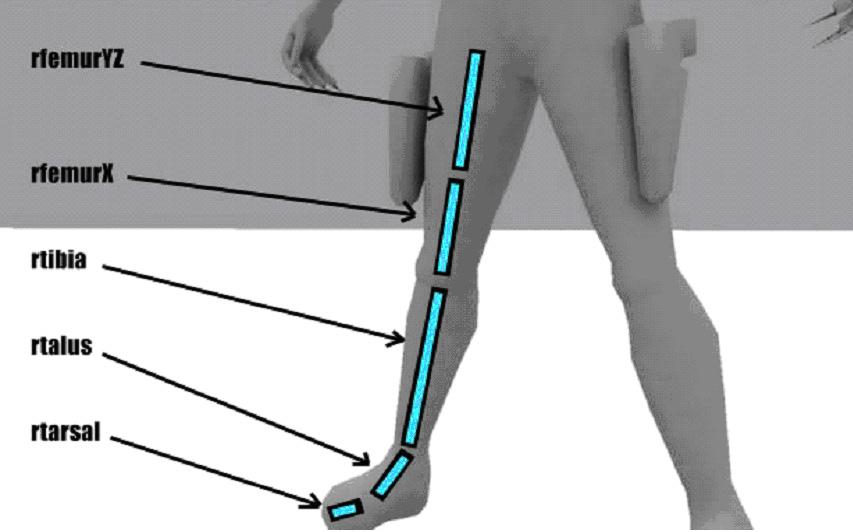
Make sure your joints are positioned in the right places. I cant stress enough the importance of this. Take another look at the root.xsi file and use it as reference. The images I've included below may be of some help but the bones are only rough marked on them. The joints are the places that are going to deform the most once the mesh is weighted so if you mesh is not placed like the root.xsi files then you'll find you'll get allot of unnecessary problems.
:c3po: is there a good way to test if your mesh is in the right place???
What I did to make certain my mesh was in the right place was to save a copy of the mesh without the bones in it. I'd already altered the mesh and moved it around the bones so it was all setup. Then I merged my scene with a saved copy of the root.xsi (I had previously saved it in max format). The skeleton and the root mesh is then placed in your scene and you are able to see exactly where you need to make the alterations. I noted the places down on paper - making sketches so I knew exactly what to do but you could just alter your model in the scene and then remove the root.xsi files mesh manually. Just find out what works best for you. Now you know your model is well positioned so make sure you save a copy of it and then proceed to weighting the mesh to the bones.
:c3po: Great I've got my model setup well but the caps are out of place ! What do I do!!!
Well you can manually move them back into place but that would be sloppy. How I got round this was to use the tip I wrote about earlier. When it comes to moving or altering the parts of your mesh that have caps, select the caps and the mesh around it. For example;
Weighting the Mesh
This is probably the most important section in this tutorial, or at least it is the section I had the most trouble with. For us to be able to use the animations that Raven have made we must weight our mesh to the bones (that are included in the root.xsi files). However you cant just import the root.xsi files and rush this job, depending on how you weight your mesh you may run into some problems along the way.
:c3po: so how do I weight my mesh?
'The
-quote from Max
Here’s a quick example of what
you do.
Right now we've got our bones we're going to quickly assign the mesh to them. There is
two different ways you can do this. The first is to use the envelope option, the capsule
like gizmo you see floating around the bone when you select it in your panel. Basically
you can select the little squares on the gizmo and expand it to encompass the verst on
your mesh.
In this image I have selected the capsule gizmo and pulled it out so that it selects most of the head, I figure since the cranium is the 'skull' bone I should apply most of my head to it.
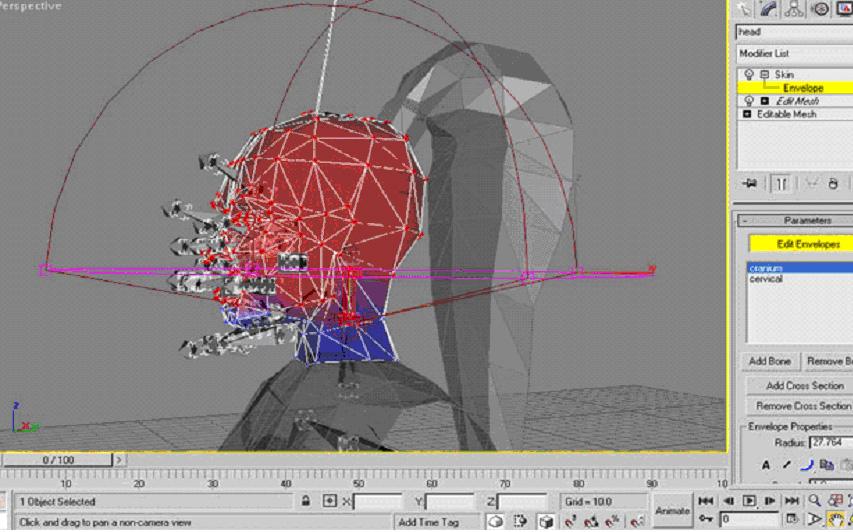
:c3po: why is some of it red and some blue? I don’t understand....
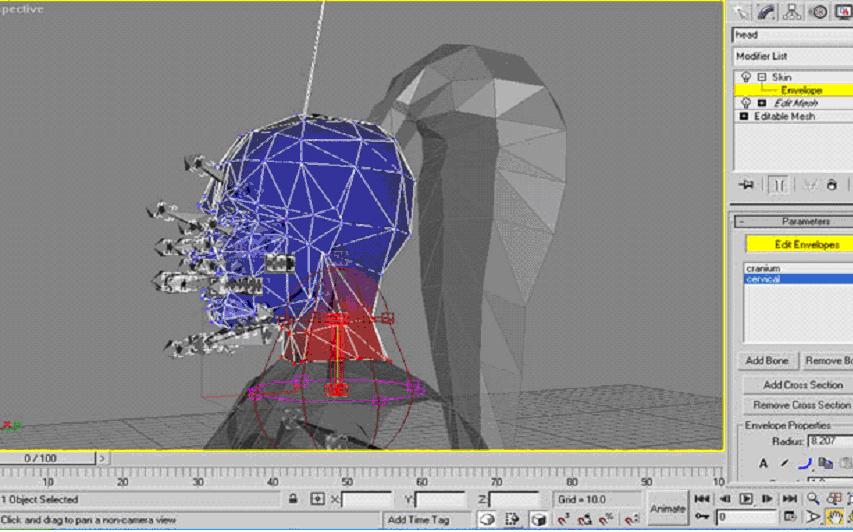
In the picture above I have selected the cervical bone.
Notice how my envelope overlaps the torso mesh and how it’s unaffected by it.
There is another way to weight your mesh and you maywell want to use it inconjunction with the envelopes. If you scroll down on your panel you can select the paint weights button. This allows you to paint individual or groups of verts with the click of a button.
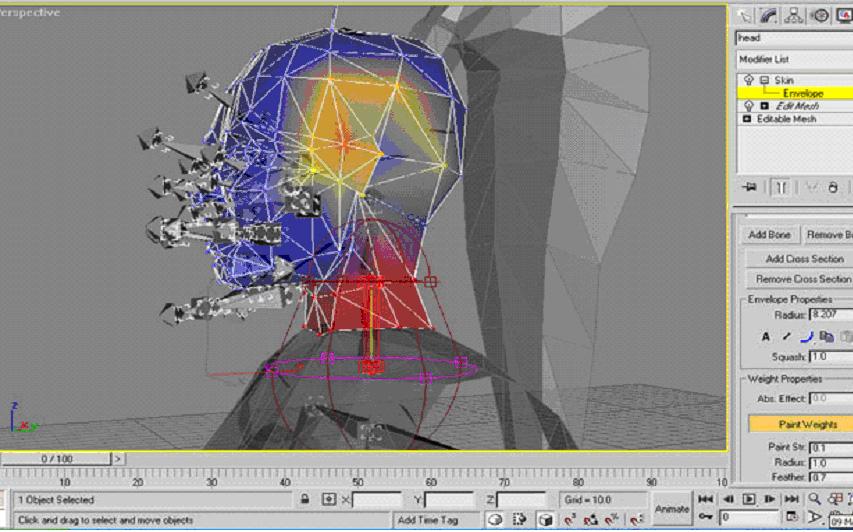
Now you see the yellow in the image above, this is because I manually painted some weights to the head. I've still got the cervical bone selected so now those verts are weighted to the cervical as well as the cranium. They appear yellow to show you that they are not absolute, that is they do not have complete control over those verts- the verts position will be determined by the craniums weights and the cervical weights now. I have only painted the verts above with weights as an example; I don’t recommend you do it.
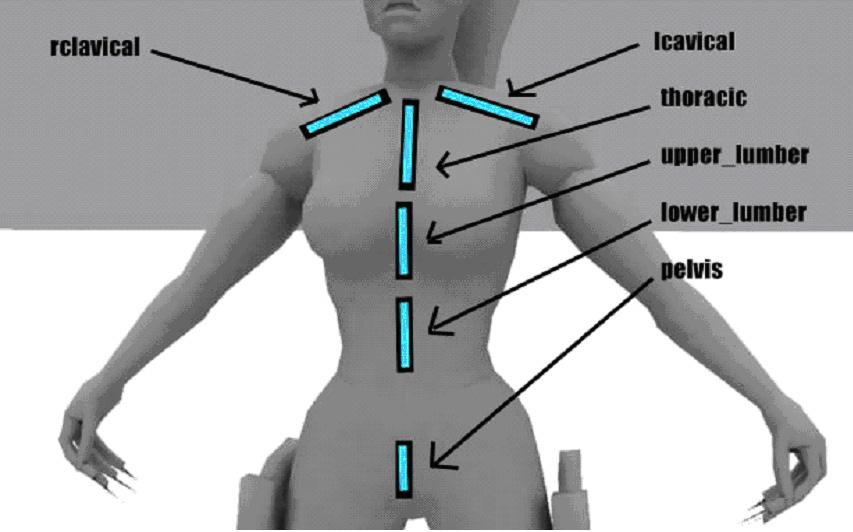
I have included the pictures below because while I was weighting my mesh to the bones I needed reference pictures so that I could easily identify the names of the bones I wanted. I think it will help you allot if you use them, as it will speed up your the whole process for you.
:c3po: thank you sir.
A final piece of advice - You are only allowed to have four different bone weights applied to any single vert on your mesh! Why? Because carcass said so, damit. That is if you assign more than 4 bones to a single vert then it won’t be allowed to be compiled in carcass.
Make sure every vert on your mesh is
weighted to a bone! I often add weights then select the bone and move it back and forth -
to watch for distortion and to make sure all the verts are weighted.
The segments can cause problems for you too, say like the segment near the joints. it can gape open during the animations unless we take care of it. If those verts around the segment are all weighted to the same bone then that wont be a problem. If they aren’t or are weighted to two bones (in the case of a joint) then your' going to need to manually weight them. Click the vertices tab (scroll down on the panel). This allows you to select vertices, you can exclude them or include. But what we are interested for now is the ability to type in the As, effect. This is basically the weight that this bone (the one you've got selected) has on the vert. I got ‘round the gaping segments by selecting the verts around the segments and weighting them 50/50 to the two different bones they where being effected by.
NO!
You’re not done with weighting yet. You must also weight all the tags on your model to bones too. Very simple to do but annoying I know. I recommend you keep it simple and only weight them to a single bone.
------------------------------
Uvw Mapping
Your model must be uvw mapped, although I mapped my model before I segmented it I did take into consideration how the different segments would affect my model.
If you look at the uvwmaps, or the skin maps as they are known that Raven produced for their models they can help you understand the sizes of textures that the game will support. At most a model should have is two 1024x1024 texture maps. It could have allot less but I think if a custom model is going to compare to the originals then it should at least use one 1024 x1024. These measurements are just the max and minimum amount of 'texture' space I would recommend you use for your model.
:c3po: but I don’t understand what uvw mapping is, I thought we where making a model not building a level.
Uvw mapping can be complicated for they unitiated. Basically you map out parts of your mesh and export them so that you can paint a texture on to them. Uvwmapping is all about a compromise between distortion and seams on your model. You have to decide how much space to give to each part of your mesh, with consideration of which parts are going to be the focus of peoples attention.
What I recommend is that you create
several maps of your model. I chose to create a head, a hair map (because there was so
much hair), a torso - body and legs map, a holster map and finally a
arms and hand map.
Here’s a quick list of the maps and the sizes I made for them;
Head 512 x 512
Hair 512x512
Torso,hips.legs 1024 x1024
Arms 512x512
Holster 256x256

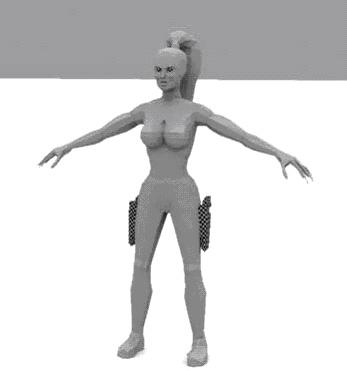
Ok the reason I have applied a checkered material to the model is to demonstrate the need for different sizes of maps. The torso and hips and legs are clearly in need of a large size map because you can see how the checkers are much larger than they are on those parts of the model that they are on the other parts. I've included two example maps of my model. As you can see they're not perfect but they may help illustrate exactly more clearly what a uvw map is.
The white lines are the edges of the polygons on my model; you create or reduce distortion by moving them to allow more space for that polygon or less. While your uvw mapping it’s a good idea to apply a checkered texture to your model so that it can help you identify area's that need fixing.
:c3po: erm I just don’t understand how to do it, can you tell me?
No. It'd take up far too much room to explain how to uvwmap a model in this tutorial but I can point you to a great place to find some tutorials.
Visit http://www.planetquake.com/polycount/
They have allot of tutorials there for various games and the tutorials about uvw mapped can be applied to Jedi knight too.
:c3po: It looks like on your arm map you included the shoulders, shouldn’t they be part of the torso mesh?
Yes I did include the shoulders on the arms maps. This was to allow an easier flow of continuity to the arms skinning. If they where separate it would have caused allot more trouble for my skinner to paint them so that they matched. Basically to overcome this I segmented the shoulders and named then torso_l_shldr and torso_r_shldr. Because they are segmented that meant that I could simply refer the game to use the arms textures and apply that to them.
:c3po: but wouldn’t that mean all your arm texture would be squished into the shoulders ?
:c3po: Ah so you mapped the torso, hips and legs in the same way then?
Yes although I mapped all those segments, once segmented they only look for the part of the map that I made them look for.
*Note your model must be uvwmapped for you to be able to export it to use compile in assimilate.
**All texture sizes have to follow
the magic number route of the quake engine. Quake likes 128, 256, 512, 1024.
If you play nice then you can even combine them to have say a
1024 x 512 texture.
----------------------------------
Assimilate
This is the program that we use to convert our models in to glm files. It attaches the humanoid.gla, the animation file that Raven uses, to our own models.
Firstly our models must be segmented, uvwmapped, all the verts must be weighted and the hierarchy must setup before we can successfully export to be assimilated.
You have to export your model from max using the xsi exporter that Raven included in the first tool release.
Now we need to extract the
humanoid.gla file from our assets0.pk3. You can find it in your base folder,
C:\Program Files\LucasArts\
If you go to models/players/_humanoid directory you will find the humanoid.gla .Don’t move it, you need for it to be in this folder because when you compile your model the game engine will look to the humanoid folder to get the animations. Basically this was done so that all the characters could share the same animations without the need of bulking up the game contents by adding 9megs of animations for each character.
Extract humanoid.gla to your own
base/models/players/_humanoid/ folder. Now we have our folder structure and we can
export our model (xsi format) your own folder.
Open assimilate - the front end
program for the compiler carcass.
Ok now you should have successfully compiled a glm. This glm will be called model.glm or whatever you called the .car file. When you come to actually putting it in game it needs to be called model.glm but for now it can be called anything. Open Modview and load your new glm. Now you will see your model animated in modview. This is a good time to check that you have got the hierarchy setup and also check that your model is deforming well.
Getting a skin on your model
But wait your model wont show any skins. What you need to do is copy a default.skin file from another player characters folder.
Inside it (open it with notepad) you will see lines like this;
hips,models/players/desann/legs.tga
r_leg,models/players/desann/legs.tga
r_leg_cap_hips_off,models/players/stormtrooper/caps.tga
l_leg,models/players/desann/legs.tga
l_leg_cap_hips_off,models/players/stormtrooper/caps.tga
hips_cap_l_leg_off,models/players/stormtrooper/caps.tga
hips_cap_torso_off,models/players/stormtrooper/caps.tga
hips_cap_r_leg_off,models/players/stormtrooper/caps.tga
hips_armor,models/players/desann/tunic.tga
torso,models/players/desann/torso.tga
l_arm,models/players/desann/torso.tga
l_hand,models/players/desann/hand_right.tga
l_hand_cap_l_arm_off,models/players/stormtrooper/caps.tga
l_arm_cap_l_hand_off,models/players/stormtrooper/caps.tga
l_arm_cap_torso_off,models/players/stormtrooper/caps.tga
r_arm,models/players/desann/torso.tga
r_hand,models/players/desann/hand_right.tga
r_hand_cap_r_arm_off,models/players/stormtrooper/caps.tga
r_arm_cap_r_hand_off,models/players/stormtrooper/caps.tga
r_arm_cap_torso_off,models/players/stormtrooper/caps.tga
r_arm_pad,models/players/desann/tunic.tga
torso_cap_head_off,models/players/stormtrooper/caps.tga
torso_cap_hips_off,models/players/stormtrooper/caps.tga
torso_cap_l_arm_off,models/players/stormtrooper/caps.tga
torso_cap_r_arm_off,models/players/stormtrooper/caps.tga
torso_armor,models/players/desann/tunic.tga
head,models/players/desann/neck_mouth.tga
head_cap_torso_off,models/players/stormtrooper/caps.tga
head_face,models/players/desann/face.tga
This is taken from Desann's default
skin file. Basically it’s a list of names telling the game engine where to find all
the skins for the model. Each line in it refers to a single segment of the mesh. As you
may have grasped the majority of the files are all in the models/players/desann directory.
This is because it’s convenient; however this also allows us, the people making
custom models to have our own skins for our own models.
If you have created red and blue skins then you can also create .skin files for them also. Except instead of being called model_default.skin they would be called model_blue.skin
Getting it in game
Everything worked so far?
Time to add an
icon. Icons are just 256 x 256 images.
Place it in your model’s folder.
But you’re also going to need to tell the game to give your character sounds. This can be done easily without the need to create your own. Decide which characters sounds you like best and then go to that characters folder and copy that sounds.cfg and paste it into your own model’s folder. Also copy the animsounds.cfg, this is so that when you swing the saber with your character it makes that noise you love so much.
Now you’re ready to zip up your basic test character. I created a new models folder for this, and placed it on my desktop. I then created a players folder within it, after that you simply copy your model’s folder and place it in the newly created players folder. Using winzip or the zip program of you choice zip up the models folder. now you should have a mymodel.zip Open winzip and check that everything is in there, your model.glm your skins, your skin files, your animsounds.cfg and your sounds.cfg. If it’s all there you did it right. Now rename the zip extension to pk3 and copy it to your “base” folder.
You may have trouble with this because a lot of you I'm sure won’t have their show all file extension option turned on. I'm not going to go into details because everyone use different systems but make sure you can see all file names - even known ones.
If you don’t have it on, then you will end up renaming your zip to - mymodel.pk3.zip - which is still a zip so wont be recognized by the game engine. If you get this right then the pk3 will be loaded by the game.
To test your success? Go to multiplayer setup a server, and load a map. Now you should have your icon available to be chosen from the default model skins. Nice huh? (If you wish, you can test your model before making a pk3 file by turning off pure mode in the advanced settings. This allows the game to use files not in pk3s.)
There’s plenty more you can do to your model but I think this is enough for one tutorial.
:c3po: Oh my circuits, R2 I need j00.
Written by Tim 'space monkey' Appleby
-thanks to Mike Gummelt and the guys at Raven for their help
-thanks to